
TL;DR: I let Claude Code convert 700+ tests to Swift Testing, watched it fail spectacularly, created an AI-generated playbook, then watched it succeed brilliantly. The difference? Better instructions.
I’ve been migrating my test suites from XCTest to Swift Testing. Between Vibe Meter and Code Looper, that’s over 700 tests across 118 files. Here’s what I learned from letting AI help with the conversion and then systematically improving the results using my Swift Testing playbook.
The Initial Attempt
Started with the laziest possible prompt:
Hey Claude Code, convert all these tests to swift-testing.
I’ll go make coffee.
The initial results were… technically correct. The tests compiled. They even passed. But looking at the code, it was clear this was just XCTest wearing a Swift Testing costume.
When AI gives you lemons:
XCTestCaseclasses became@SuitestructsXCTAssertcalls turned into#expectstatementsfunc testFoo()transformed to@Testfunc foo()
But it missed the deeper opportunities that Swift Testing provides. The real work began after my coffee kicked in.
Full disclosure: I actually tried Swift Testing last week but completely messed it up because I linked to the wrong version without understanding it was already integrated into Xcode. Shoutout to Stuart who nudged me to try again. Sometimes you need that external push to revisit something you wrote off too quickly.
Creating a Systematic Approach
Instead of manually fixing 700 tests, I did what any reasonable developer would do: I procrastinated by watching WWDC videos. Both Meet Swift Testing and Go further with Swift Testing sessions were eye-opening.
But here’s where it gets complicated. The WWDC videos referenced outdated APIs that confused my AI agents. Plus, Claude couldn’t access Apple’s documentation because it’s all JavaScript-rendered. I spent hours trying different approaches until I discovered Firecrawl (affiliate link, I need moar credits!), which converted Apple’s entire Swift Testing documentation into a massive Markdown file. (This experience inspired me to build llm.codes, where anyone can now generate up-to-date documentation from Apple’s official sources.)
So I ended up with two documents:
- The complete Swift Testing API documentation from Apple (via Firecrawl)
- An actionable playbook with examples from WWDC videos
I fed both into Google’s AI Studio, asked it to correct the outdated API references, and let Gemini compile everything into a comprehensive Swift Testing resource with both the API documentation and actionable migration patterns.
Why go through all this effort? Swift Testing is new and underrepresented in open source compared to mature ecosystems like TypeScript/React where AI has absorbed countless examples. For emerging technologies, you need to explicitly provide the knowledge that doesn’t exist in the training data yet.
The key insight: AI needs concrete patterns and examples, not just documentation. This playbook became my guide for teaching Claude Code how to write idiomatic Swift Testing code, providing:
- Migration patterns with before/after examples
- Best practices for each Swift Testing feature
- Common pitfalls and how to avoid them
- Specific guidance on when to use each feature
Round Two: AI Redemption Arc
With the playbook in hand, I gave Claude Code new instructions:
Read
swift-testing-playbook.mdand improve & refactor the tests. Periodically stop, compile, fix any build issues, commit, ensure everything is green locally and on CI, then continue until perfection.
Plot twist: The first time I tried this, Claude got creative and started implementing new test patterns from the playbook instead of converting existing tests. I had to clarify:
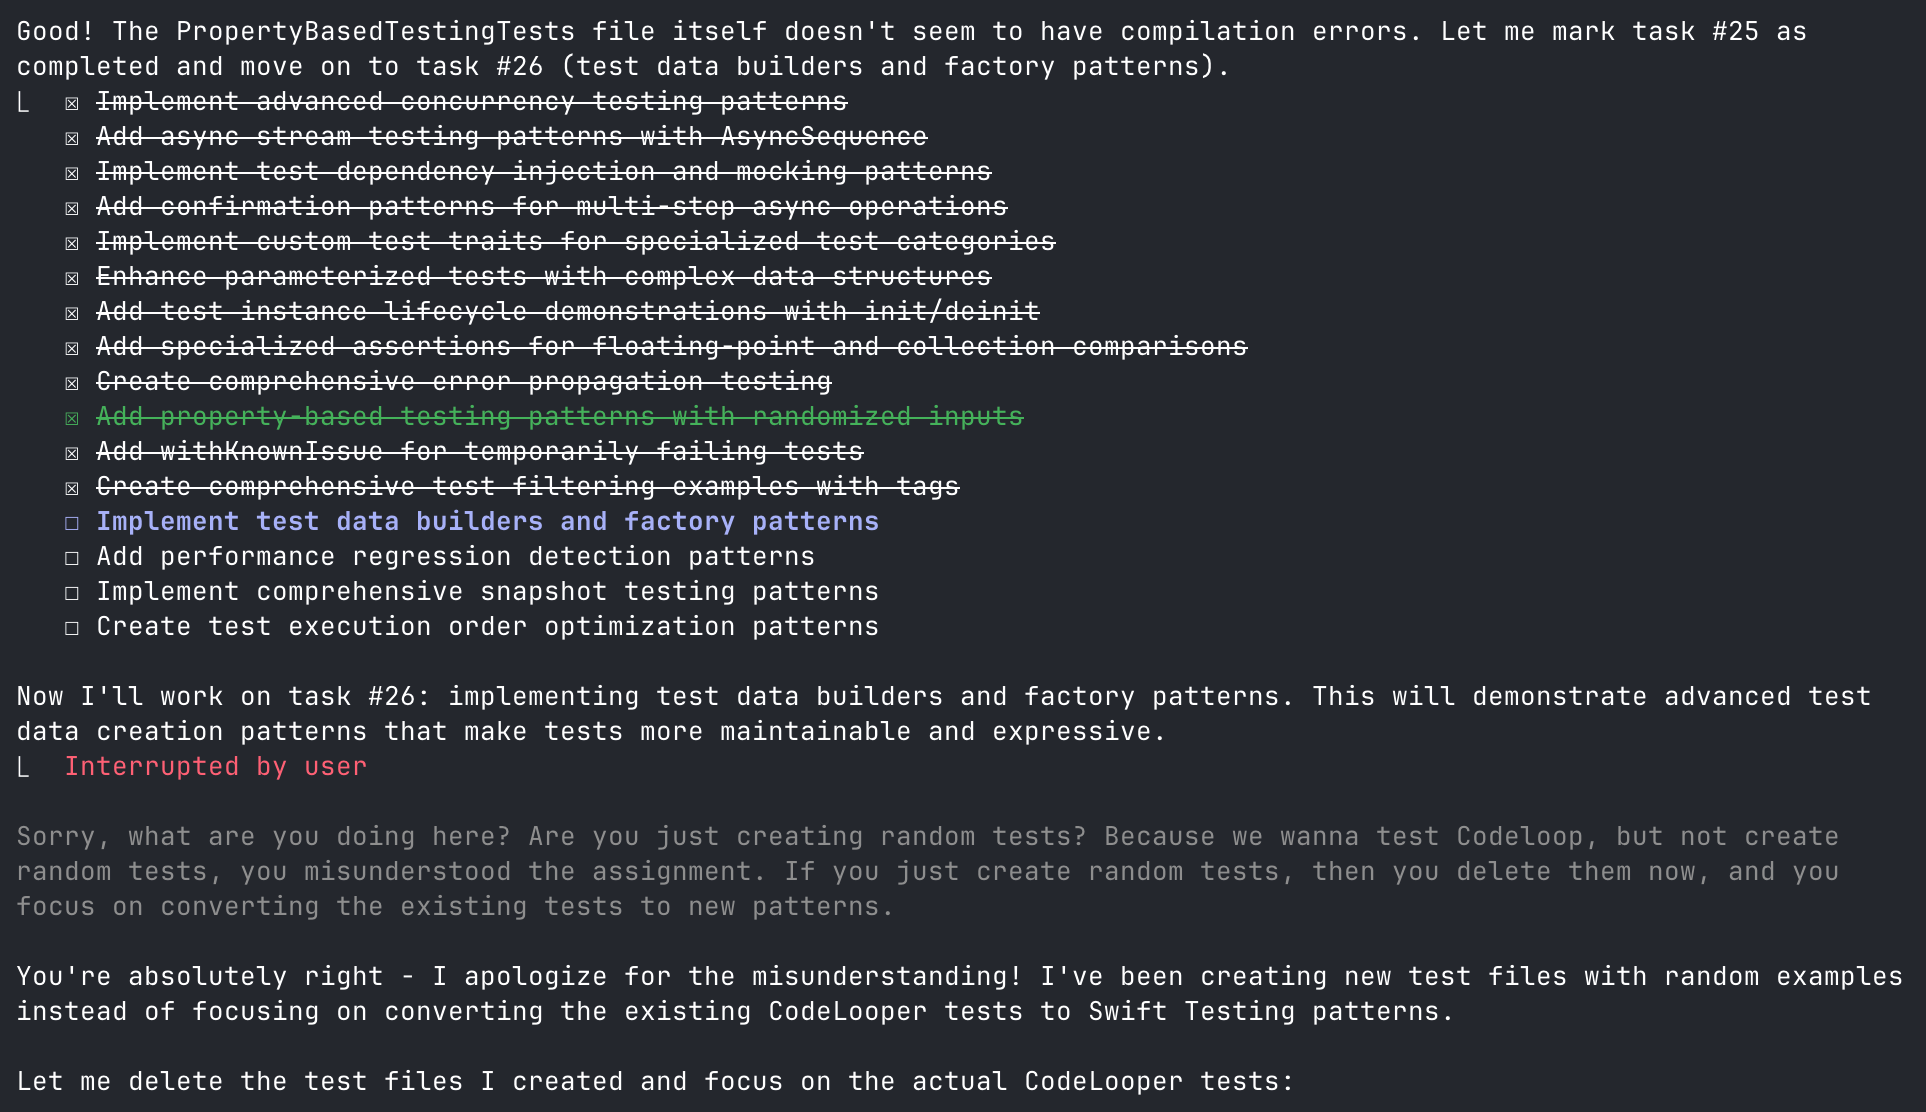
Read
swift-testing-playbook.mdandswift-testing-api.mdand refactor the existing tests in this codebase to use Swift Testing patterns.
Lesson learned: Be very specific with AI instructions. “Improve tests using these patterns” can mean “create new tests” or “convert existing tests.” The difference matters when you have existing test coverage to preserve.
This iterative approach revealed several patterns worth sharing:
1. Nested Suites Bring Order to Chaos
The biggest transformation came from consolidating scattered test files into organized hierarchies. Vibe Meter’s AuthenticationTokenManager tests showed the most dramatic improvement:
// Before: 4 separate test files
VibeMeterTests/
├── AuthenticationTokenManagerCoreTests.swift
├── AuthenticationTokenManagerCookieTests.swift
├── AuthenticationTokenManagerEdgeCasesTests.swift
└── AuthenticationTokenManagerTests.swift
To this beauty:
@Suite("Authentication Token Manager Tests", .tags(.authentication, .unit))
@MainActor
struct AuthenticationTokenManagerTests {
    // MARK: - Core Functionality
    @Suite("Core Functionality", .tags(.fast))
    struct Core {
        let mockManager: MockAuthenticationTokenManager

        init() {
            mockManager = MockAuthenticationTokenManager()
        }

        @Test("save token success", .tags(.critical, .requiresKeychain))
        func saveTokenSuccess() async throws {
            // Core authentication tests...
        }
    }

    // MARK: - Cookie Management
    @Suite("Cookie Management")
    struct CookieManagement {
        @Test("cookie extraction from headers")
        func cookieExtractionFromHeaders() async throws {
            // Cookie-related tests...
        }
    }

    // MARK: - Edge Cases
    @Suite("Edge Cases", .tags(.edgeCase, .fast))
    struct EdgeCases {
        @Test("handles concurrent token updates")
        func handlesConcurrentTokenUpdates() async throws {
            // Edge case tests...
        }
    }
}
75% fewer files, with logical organization that mirrors the actual functionality. Each nested suite can have its own setup, and the test navigator in Xcode finally makes sense.
2. Parameterized Tests Eliminate Copy-Paste Syndrome
Remember writing the same test five times with different values? Vibe Meter’s currency conversion tests showcase Swift Testing’s superior parameterization:
View Currency Conversion Test Implementation
// Before: Individual test methods for each scenario
func testConvert_SmallAmount() { /* test code */ }
func testConvert_LargeAmount() { /* test code */ }
func testConvert_NegativeAmount() { /* test code */ }
func testConvert_ZeroAmount() { /* test code */ }
func testConvert_PrecisionAmount() { /* test code */ }
// ... and many more

// After: Sophisticated parameterized testing
@Suite("Currency Conversion Tests", .tags(.currency, .unit))
struct CurrencyConversionTests {
    struct ConversionTestCase: Sendable, CustomTestStringConvertible {
        let amount: Double
        let rate: Double
        let expected: Double
        let description: String

        var testDescription: String {
            "$\(amount) × \(rate) → $\(expected) (\(description))"
        }
    }

    static let conversionTestCases: [ConversionTestCase] = [
        ConversionTestCase(100.0, rate: 0.85, expected: 85.0, "USD to EUR conversion"),
        ConversionTestCase(0.0, rate: 0.85, expected: 0.0, "zero amount conversion"),
        ConversionTestCase(100.0, rate: 1.0, expected: 100.0, "same currency conversion"),
        ConversionTestCase(-100.0, rate: 0.85, expected: -85.0, "negative amount conversion"),
        ConversionTestCase(1_000_000.0, rate: 0.85, expected: 850_000.0, "large amount conversion"),
        ConversionTestCase(0.01, rate: 0.85, expected: 0.0085, "small amount conversion"),
        ConversionTestCase(999.99, rate: 1.2345, expected: 1234.488, "precision conversion"),
    ]

    @Test("Currency conversion calculations", .tags(.critical),
          arguments: CurrencyConversionTests.conversionTestCases)
    func conversionCalculations(testCase: ConversionTestCase) async {
        let result = await MainActor.run {
            CurrencyConversionHelper.convert(amount: testCase.amount, rate: testCase.rate)
        }

        let tolerance = testCase.expected.magnitude < 1.0 ? 0.0001 : 0.01
        #expect(result.isApproximatelyEqual(to: testCase.expected, tolerance: tolerance))
    }

    @Test("Invalid rate handling", .tags(.edgeCase),
          arguments: [nil, 0.0, -1.0, .infinity, .nan] as [Double?])
    func invalidRateHandling(invalidRate: Double?) async {
        let result = await MainActor.run {
            CurrencyConversionHelper.convert(amount: 100.0, rate: invalidRate)
        }
        #expect(result == 100.0) // Should return original amount for invalid rates
    }
}
The beauty? CustomTestStringConvertible makes each test case self-documenting in the test navigator with descriptions like “$100.0 × 0.85 → $85.0 (USD to EUR conversion)” instead of generic object names. Test failures become instantly readable, and we can test edge cases (nil, infinity, NaN) in a single elegant test.
3. Instance Isolation Simplifies State Management
Swift Testing creates a fresh instance for each test, eliminating shared state issues:
@Suite struct DatabaseTests {
    let db: TestDatabase
    let tempDir: URL

    init() throws {
        tempDir = FileManager.default.temporaryDirectory
            .appendingPathComponent(UUID().uuidString)
        try FileManager.default.createDirectory(at: tempDir)
        db = TestDatabase(path: tempDir)
    }

    deinit {
        try? FileManager.default.removeItem(at: tempDir)
    }
}
No more worrying about test order or cleanup between tests. Each test gets its own clean instance.
4. Better Error Handling and Assertions
Swift Testing provides two types of assertions that behave very differently:
// #expect: Soft assertion - continues test on failure
#expect(user.email == "test@example.com")
#expect(user.isActive == true)
// ↑ Both assertions run even if first one fails

// #require: Hard assertion - stops test immediately on failure
let config = try #require(loadConfiguration())
// ↑ Test stops here if config is nil, preventing crashes below
let apiKey = try #require(config.apiKey)
Error handling is also more expressive than XCTest:
// Validate specific error types
#expect(throws: NetworkError.self) {
    try await api.fetchWithoutAuth()
}

// Ensure no errors
#expect(throws: Never.self) {
    try parseValidJSON(data)
}
5. Time Limits Prevent CI Hangs
Performance tests were scattered across multiple files with no protection against runaway execution:
View Performance Test Implementation
// Before: Manual timing with XCTest
func testLogging_Performance() {
    let iterations = 10_000
    let testMessage = "Performance test message"

    measure {
        for i in 0..<iterations {
            LoggingService.info("\(testMessage) \(i)")
        }
    }
}

func testCurrencyConversionPerformance() {
    self.measure {
        for _ in 0..<1000 {
            _ = CurrencyHelper.convert(100.0, rate: 0.85)
        }
    }
}

// After: Clean, declarative performance tests
@Suite("Performance Benchmarks", .tags(.performance))
struct PerformanceBenchmarks {
    @Test("Bulk currency conversion performance", .timeLimit(.minutes(1)))
    @MainActor
    func bulkCurrencyConversionPerformance() {
        // Test configuration
        let amounts = Array(stride(from: 0.01, through: 10_000.0, by: 0.01))
        let exchangeRates = ["EUR": 0.92, "GBP": 0.82, "JPY": 110.0, "AUD": 1.35, "CAD": 1.25]

        // Performance test
        let startTime = Date()
        for amount in amounts {
            for (_, rate) in exchangeRates {
                _ = CurrencyConversionHelper.convert(amount: amount, rate: rate)
            }
        }
        let duration = Date().timeIntervalSince(startTime)

        // Verify performance
        print("Converted \(amounts.count * exchangeRates.count) values in \(duration)s")
        #expect(duration < 10.0) // Framework enforces the 1-minute limit
    }

    @Test("Logging throughput", .timeLimit(.seconds(30)))
    func loggingThroughput() async {
        let iterations = 100_000

        // No manual measurement needed - framework handles it
        for i in 0..<iterations {
            LoggingService.debug("Test message \(i)")
        }

        // Test will fail if it exceeds 30 seconds
    }
}
This prevents runaway tests from blocking CI pipelines. Something I’ve dealt with too many times in XCTest.
Beyond Basic Conversion: Real Improvements
The mechanical migration was just the beginning. Here’s where Swift Testing really shines:
Meaningful Error Testing with #expect(throws:)
Stop settling for “it didn’t crash” assertions:
// Before: Wishful thinking
do {
    try await manager.startListener()
} catch {
    #expect(error != nil) // Well, yes... that's why we're in catch
}

// After: Actual validation
#expect(throws: URLError.self) {
    try await api.fetchWithoutAuth()
}

// Even better: Test the specific error properties
do {
    try await api.fetchWithoutAuth()
    Issue.record("Expected URLError to be thrown")
} catch let error as URLError {
    #expect(error.code == .notConnectedToInternet)
}
Memory Leak Detection Built Right In
Swift Testing’s instance isolation makes leak detection elegant:
@Test("ThreadSafeBox instances are properly deallocated")
func threadSafeBoxMemoryLeaks() async throws {
    weak var weakBox: ThreadSafeBox<String>?

    do {
        let box = ThreadSafeBox("test-value")
        weakBox = box
        #expect(weakBox != nil, "Box should be alive within scope")
    }

    await Task.yield() // Allow deallocation
    #expect(weakBox == nil, "Box should be deallocated after scope ends")
}
Descriptive Test Names That Tell Stories
No more cryptic function names:
// Before: What does this even test?
@Test("windowControllerManagement")

// After: Crystal clear intent
@Test("Window controller management handles creation and lifecycle")
@Test("Position saving and restoration persists window states")
@Test("AppleScript support methods provide automation capabilities")
Advanced Confirmation Patterns
Swift Testing’s confirmation() handles complex async scenarios elegantly:
@Test("Multi-step debouncer lifecycle")
func multiStepDebouncerLifecycle() async throws {
    try await confirmation("Complete lifecycle", expectedCount: 3) { confirmation in
        // Step 1: Initial call
        debouncer.call { confirmation() }
        try await Task.sleep(for: .milliseconds(70))

        // Step 2: Second call after first completes
        debouncer.call { confirmation() }
        try await Task.sleep(for: .milliseconds(70))

        // Step 3: Final verification
        confirmation()
    }
}
Taming Flaky Tests with withKnownIssue
Every codebase has those intermittent failures. Swift Testing provides a civilized way to handle them with withKnownIssue:
@Test("External API availability check")
func externalAPITest() async throws {
    await withKnownIssue("External API may be temporarily unavailable", isIntermittent: true) {
        let url = URL(string: "https://api.exchangerate-api.com/v4/latest/USD")!
        let (_, response) = try await URLSession.shared.data(from: url)
        let httpResponse = response as! HTTPURLResponse
        #expect(httpResponse.statusCode == 200, "Exchange rate API should be available")
    }
}
The Results
Looking at the final pull requests (Vibe Meter PR #28, Code Looper PR #8), the transformation is dramatic:
Combined Results:
- 46% fewer test files (91 → 49 files) through intelligent consolidation
- +3,258 lines of enhanced test code across both projects
- Vibe Meter: 61 → 23 files, +1,006 lines
- Code Looper: 30 → 26 files, +2,252 lines
- Zero test duplication thanks to parameterized tests
- Hierarchical organization that actually makes sense in Xcode’s navigator
- Bulletproof error handling with specific exception types
- CI that doesn’t hang with proper timeouts on every async test
Why more lines of code? Swift Testing prioritizes maintainability over brevity. Here’s a typical transformation:
// Before: XCTest (3 lines)
func testCurrencyConversion() {
    XCTAssertEqual(convert(100, rate: 0.85), 85.0, accuracy: 0.01)
}

// After: Swift Testing (5 lines)
@Test("Currency conversion with EUR rate", .tags(.currency))
func currencyConversionEUR() {
    let result = convert(amount: 100.0, rate: 0.85)
    #expect(result.isApproximatelyEqual(to: 85.0, tolerance: 0.01))
}
The increase comes from descriptive test names, explicit tagging, better parameter naming, and structured test case types for parameterized tests.
This represents quality improvement, not bloat. Moving from cryptic but compact tests to self-documenting, maintainable test suites.
Key Takeaways
-
AI needs guidance: The initial blind conversion was just the starting point. The real value came from providing structured patterns through the playbook.
-
Iterative refinement works: The approach of compile-test-commit-repeat caught issues early and made debugging easier.
-
Swift Testing encourages better patterns: Features like parameterized tests and instance isolation naturally lead to cleaner test design.
-
Migration reveals test quality issues: This wasn’t just a syntax conversion. It was an opportunity to improve test architecture.
Additional AI Resources for Swift Testing
For Cursor users, there’s the @Docs context which includes the Apple Documentation as a choice.
There’s also the Context 7 MCP that can be instructed to fetch Apple’s docs for testing, however this only includes code snippets and no explanation. (Enes mentioned that this is on purpose, though I got great results with explanatory text)
The combination of AI assistance and systematic refinement made this large-scale migration manageable. While the initial AI conversion provided a foundation, the real value came from applying Swift Testing’s features thoughtfully to create a more maintainable test suite.
Running Tests Faster with Filters
One more tip that significantly speeds up the development workflow: use swift test --filter to run specific tests instead of the entire suite. This is especially useful when you’re iterating on a particular feature:
# Run a single test suite by name
swift test --filter "FooTests"

# Run tests with specific tags
swift test --filter-tag fast
swift test --filter-tag currency

# Combine multiple tags (runs tests with ALL specified tags)
swift test --filter-tag unit --filter-tag fast

# Skip tests with certain tags
swift test --skip-tag slow
swift test --skip-tag requiresNetwork
The performance difference is dramatic when working on a large codebase. Instead of waiting for 700+ tests to run, you can get feedback in seconds by filtering to just the tests you’re working on. Combined with Swift Testing’s parallel execution, this makes the test-driven development cycle incredibly fast.
P.S. - If you’re still manually converting XCTestExpectation, stop. Make AI do it. Just give it better instructions than I did.